|
|
ü@
ü@
ü@ü@ü@
ü@
ü@
ü@Chief engineer Kameari Kabuto
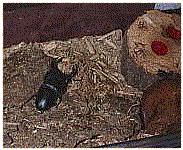
Unlike Allomyrina dichotoma or Prosopocoilus inclinatus, Ookuwagata may survive a couple of years with good rearing. It prefers a relatively dry environment and hates excessive humidity. It usually habitates in a hollow of a tree and very seldom flies.
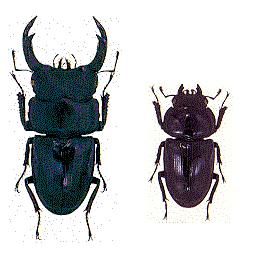
The largest imago can be as large as 75mm. In spite of its powerful mandibles, it is quite timid and hides if it senses the presence of human beings. On the other hand, it sometimes reveals its aggressive nature, attacking and eating other beetles or even other Ookuwagata if bred in a crowded container. Its larvae should be reared individually to avoid cannibalism, too.
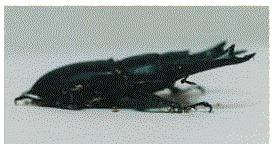
Both males and females are black. The male mandibles have teeth close to the top. Depending on the size of the individual, the teeth may vary in their shapes. Small individuals have teeth that point to the base (small teeth type), mid-sized ones have teeth that point inward (middle teeth type) and large ones have teeth that point toward the top (large teeth type). Also small individuals have more gloss and lines of dots on the back.
The females have strong gloss and lines of dots on the back.
They habitate mainly in flat areas of mainland Japan and other islands such as Shikoku, Kyushu and Tsushima, and a few are reported to habitate also in Hokkaido.
Ookuwagata is a holometabulous insect, meaning it goes through a few metamorphoses, from egg to larva to pupa and finally to imago.
There are 3 stages of a larva, each being separated by ecdysis. As a preparation, it turns into a pre-pupa just before pupation.
The life cycle differs depending on conditions and individual differences as described in the following.
| 2 years with hibernation type The egg is born in the fall. It pupates after 2 years of larva stage. It hibernates in its pupa chamber for the first winter following emergence. It finally appears in the field in the next summer.
1 year with hibernation type
2 years without hibernation type
1 year without hibernation type |
ü@
The first thing you need is of course the Ookuwagata itself. But it is quite difficult to find wild ones even for veteran collectors. It would be impossible for a beginner.
But you don't have to give up. You can always buy them, if you can't find them in the forests.
Fortunately, the Ookuwagata craze seems finally to be over these days and the prices have become rational. They tend to be a bit more expensive in department stores but you should be able to find them easily in many pet shops. It would be another good idea to ask somebody for a few who already rear many.
Now you have your Ookuwagata to rear. Let's begin.
1) Rearing of imagoes
The imagoes are quite robust, and it is relatively easy to rear them unless you treat them extremely badly.
Molds and ticks that may prevail in the rearing containers don't seem to harm them very much, either.
But if you decided to rear them, it would be of course a better idea to rear them better for longer life.
(1) What to prepare.
Nothing really peculiar is necessary. All of the items in the list could be easily found in a pet shop and the like.
Some of the stuff may be difficult to find depending on the season, but you can always buy them somehow by mail order throughout the year.
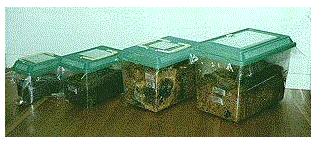
o Container for rearing
A plastic container would do. It had better not be too small, though.
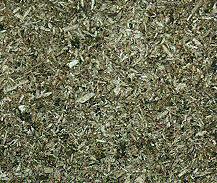
o Flakes
The conventional wood flakes sold for insects would do. The flakes must be of broad leaf trees such as Kunugi (Quercus acutissima, a popular kind of acorn tree in Japan). You should avoid those mixed with needle tree flakes. The insect flakes (called "insect mat") are popularly sold in pet shops and home centers in Japan. But as they can be pretty seasonal, you might as well buy some stock before they disappear from shops.
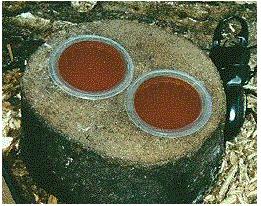
o Food plate
A wooden plate for food. If you place a piece of food directly on the mat (flakes), it may lead to prevalence of molds and ticks. So you had better prepare a wooden plate to put the food on.
o Moisturizer
A water sprayer that may be acquired in "a 100 yen shop" (a popular type of shop in Japan, all merchandise are priced at 100 yen) would do. But it might be a better idea to prepare a more decent one that may be used in gardening, as a very cheap one may not last long.
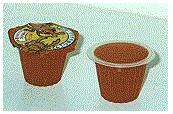
o Food
Dedicated insect jelly food, banana, and apple are just fine. Watery fruits such as melon and watermelon may not be good for them, as they may cause indigestion leading to a short life.
o Branches and barks
These help Ookuwagata to get up when they accidentally tumble down. If they are left upside down for a long time, it is very bad for them.
Heat up the mat to kill undesired insects such as ticks and drosophilae (small flies). Their existence actually does not affect stag beetles very much. But if you have many of them in the container, that is very unsanitary. So we recommend some kind of preparation. (The influence of ticks on stag beetles shall be discussed later.)
o Microwave oven attack
Heat the mat stuffed in a plastic bag. Be careful not to heat it too much.
o Boiling attack
Put the mat in a plastic bag that was designed to go in a microwave oven. Put the bag in boiling water on the stove. You don't need to boil it too long.
o Bathing hot water attack
Prepare a basin with hot water (about 55 degrees C) and sink the mat kept in a plastic bag. Change the hot water when it gets tepid.
|
The purpose is to kill the insects. So one minute in 55 degree C hot water would do. |
ü@
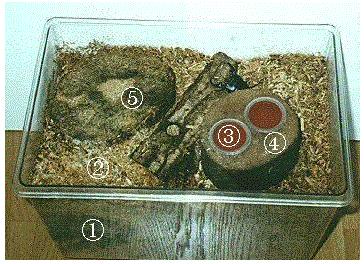
(3) Setting
Now you have everything. Set them up to start the Ookuwagata rearing you've been longing for.
o Setting the mat
Put some mat (2) into the rearing container (1).
Fill about a half of the container with the mat.
If the container is large enough, you may not need as much as a half.
o Branches and barks (5), food plate(4), and food (3)
Set the branches and food plate. Set the food into the plate.
o Moisturization
Give appropriate moisture to the mat. Dryness to some extent is preferable to excessive humidity. If the mat is humid enough in the beginning, you don't have to moisturize it any more.
o Avoiding excessive dryness
To avoid excessive dryness, it would be a good idea to place a plastic sheet or wrap with small holes (for ventilation) between the lid and the container itself. If it should get too humid that way, place another sheet of newspaper or the like in between.. This should prevent also prevalence of drosophilae.
o Setting imagoes
It is highly recommended to rear individual imago in separate containers.
You chance of breeding will be greater if you keep the male and the female separately except for the time of mating.
|
|
ü@
(4) Control
Do your best to rear long-lived beetles. 3 years of rearing would be regarded as quite successful.
ü@
o Where to keep
After the setting, keep it in a relatively cool place in your house where the temperature change is not too steep.
o Food
Replace the food before it gets rotten. Jelly and apple stay good longer than banana, which rots relatively fast and needs frequent changing.
Cautiion: A female sometimes bores into a piece of banana. So you must be careful when you change it so that you don't throw the beetle away.
| Food for breeding season
If fed on insect jelly only, they may cannibalize each other to make up for lack of protein. So you should feed them on protein-rich food. * Protein-rich food: Refer to (5). Try different kinds and observe them carefully to cope with their individual tastes. Fastidious individuals tend to die earlier. |
ü@
o Moisturization
Use a water sprayer just to wet the surface and the mat every once in a while.
If the container looks foggy by collecting moisture, you don't need to add any more moisture.
And if it seems to be excessively moist all the time, you might as well remove the plastic sheet cover against dryness.
| You should never feed Ookuwagata and similar beetles on food that is too watery. But if fed on jelly and apples only, they seem to want a little more water sometimes, and you might be able to observe them sucking on drops of water.üB |
ü@
o Tics
If you find many ticks clinging on Ookuwagata you may wash them off using a soft toothbrush and water.
If the mat itself seems to be dominated by ticks, you might as well exchange it all, or apply a heating process. If you keep the mat relatively dry, an excessive prevalence of ticks should be prevented.
| Most ticks actually rely on the food adhering to Ookuwagata and probably do no harm to Ookuwagata (and not to humans either....maybe, except for those with dust allergy, etc.). But they are yet many kinds of ticks that are not even classified. So even a specialist wouldn't know anything for sure. Sometimes you may observe some larvae that seem to be attacked by ticks. But the case actually seems to be that the larvae get ill for other reasons first and the ticks swarm to the weakened bodies. |
ü@
o Hibernation
Take following measures for healthy hibernation.
| Where to keep
Any place would do if it doesn't get extremely cold. If it is inside the house, select a relatively colder place without much fluctuation of temperature. Period of hibernation It is usually from November to March (in Japan). But it actually depends much on individuals and environments. Food No food is required. Give it when it wakes up in the spring. You may place an insect jelly in the container maybe in late March in preparation for their awakening so you can avoid starvation. If the room is rather warm, they stay awake even in winter. You might as well feed them in such a case. Avoid dryness It is OK as long as the mat is not completely dry. You don't really have to take much care of them during hibernation. But I do recommend you take a look sometimes to see how it is doing. |
ü@
2) Breeding
If you have a pair, why don't you try breeding ?
You might be able to reproduce many.
Then you would be a complete stag beetle freak....or a stag beetle breeder.
(1) Preparation
The adequate bed wood (for them to lay eggs) may be the hardest item to acquire. But you can find it surely in a large department store. It may be a good idea to get it by mail order.
o Breeding container
The larger the better. You might as well use a large plastic clothes container.
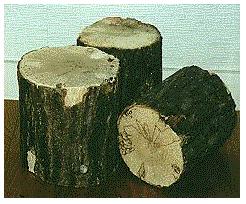
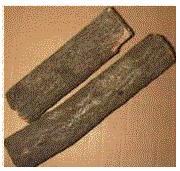
o Bed wood
A block of wood which is adequately decayed by certain type of fungus. It had better be larger than 10cm in diameter and 20cm in length. It should be of Kunugi or other kind of broad leaf trees.
An old block of Shiitake mushroom (Lentinula edodes) log can be cut and used as well.
o All the rest (such as food plate) is much the same with 1) (1)
(2) Preparation of bed wood
If you just use the wood as is, the female may not like it and lay no eggs. Make sure to apply some measures to kill the insects and to moisturize it to avoid failure.
o Killing insects in the bed wood
Kill harmful insects such as Kometsuki (a carnivorous insect often found in rotten woods).
The method is the same as in (1), (1).
ü@
| Microwave oven attack (1) (recommended)
Heat the wood slightly in the microwave oven. The harmful insects will die without heating it too much. Excessive heating may lead to burning of the wood. Microwave oven attack (2) Give moisture to the bed wood, put it in a plastic bag and heat it to kill the insects. Boiling attack Put it in a plastic bag (a type used for microwave oven) and boil it. You don't have to boil it too long. Bathing hot water attack Prepare hot water in a basin and sink the bed wood. Water attack Sink the bed wood in water for a whole day, so that the carnivorous insects will die out. This process can not kill the ticks. |
ü@
|
|
o Moisturizing the bed wood
Sink the bed wood in water for a couple of hours. If you already sank it in water to kill the insects as described above, no more sinking is necessary.
Dry it for one or half day.
(3) Setting
Set the mat in the container and bury the bed wood half in the mat. If you bury it completely in the mat that may prevent mold but it is not good for observation purposes.
o Prevention of mold
To prevent mold, push and compress the mat a little hard to exclude air pockets.
Air pockets in the mat lead to molding.
If you apply some fine mat to the parts of the bed wood that are out of the mat,
that may prevent molding, too.
| Actually the mold does not seem to harm Ookuwagata very much. But if the female doesn't like it, she may give up on laying eggs there. So you will have greater chance of getting eggs by preventing mold. |
ü@
o Conditions and number of bed woods
The female does not lay any eggs in the wood at all if it dislikes the wood. So in order to get as many eggs as possible, you should provide maybe 4 blocks of wood of different conditions such as hardness, humidity, etc. The bark may be removed or left as is. Mold may be better prevented with the bark on.
Also, you might as well try boring some holes to help the female start boring further from there on.
(4) Mating
Rear a pair together in the container that you provided for breeding. Watch carefully and make sure that the pair is not in a fighting mode.
If you see them fighting each other rather often and that does not seem to cease soon, it means that the pair is not suitable for mating. So you should try another combination before the male kills the female.
If you confirm their successful mating, you had better take the male out of the container so that the female can concentrate on laying eggs.
(5) Food
Try to give the female some food rich in protein before mating. If the female is in need of protein, it may try to eat the male for protein.
The following should be fine.
| Banana
It may not like banana alone. So you might as well try adding insect jelly or the honey-like food for rhinoceros beetles (commonly sold in Japan) to it. Lard Mix the same amount of lard and insect jelly and heat it in the microwave oven. Give it after cooling. Yoghurt Pour some over the insect jelly. Egg white Pour some over the insect jelly. Forbidden rhino-beetle pupa This is widely known among Ookuwagata breeders. Ookuwagata actually seems to like it. It may be natural out in the field. There is a rumor that it leads to a much greater number of eggs, but I myself have never tried it yet. Of course it is not "legally" forbidden. It just sounds immoral or grotesque. |
(6) Laying eggs
The female bores some large holes in the bed wood and lays eggs inside or it bores just little holes on the surface for laying eggs. Either way, it fills in the hole with crumbs of wood after laying very carefully. It is said to take more than 2 hours to lay just one egg. If the wood is rather soft, the female tends to bore many holes, while if it is hard, it tends to lay eggs in small holes near the surface.
o Period of laying eggs
If the female starts biting the bed wood it must have started its "egg laying" mode.
You should be able to notice it by the rather loud noise.
| If you still have the pair together then, you had better take the male out of the container if possible, as it is expected to have finished coitus. |
o Avoid shaking
During the egg laying, you should leave the container alone as long as possible. If it feels strange movements it may stop laying eggs that day even if it has finished boring a hole. Or in the worst case, it may completely give up on that hole.
o Darkness
The female prefers darkness. You may be able to notice the food is consumed more quickly when the female is reared in a dark place.
If you keep the whole container in a dark cardboard box or something, the female keeps boring holes all day.
o Moisturizing
Use water sprayer once in a while as in usual rearing. If the bed wood seems to be dry, spray it as well.
If the wood block stands upright, it is easier to moisten it from its top surface.
(7) Retrieving the bed woods and the larvae
If you think the female must have laid some eggs, you might as well take it out and retrieve the larvae.
o Replacement of bed wood
You had better take out the bed wood about 2 months after pairing.
If you leave it too long, the female may eat or squash the eggs and larvae as it keeps boring holes.
If you take out the bed wood, you should put in another one or two blocks of new bed wood.
o Treatment of the newly retrieved bed wood
When you take it out, you had better bury it in a newly prepared mat and leave it there for a month. This way you can avoid retrieving the insects in the egg stage. It is not ideal to retrieve the eggs, because it is sometimes hard to let them hatch once you take them out. If you take them out as first stage or second stage larva, it will be much easier to get them to new environments successfully. If you leave them there too long, the larvae turn into their third stage and start to eat each other.
o How to retrieve the larvae from the bed wood
Now it is high time to crack the bed wood to get the larvae out.
Use a straight-head screwdriver or a long-nose plier carefully to crack the wood little by little along the grain.
If you find the larva's path, be even more careful so you don't hurt the larva.
o Retrieving the larvae
When you find larvae, you should keep each one of them for the time being in an individual container, such as a glass bottle with a wide opening. In order to avoid fighting and cannibalism, you should never keep more than one in a single container even if the container seems large enough.
| For this first treatment, you don't have to compress the mat too hard. It seems to let the larva grow faster to compress the mat just a little. |
ü@
|
|
o Keeping the cracked bed woods (for extra larvae)
Don't throw away the cracked pieces of bed wood. You should keep them for a while buried in the mat in hopes of finding some extra eggs and larvae later.
3) Rearing the larvae
Rearing larvae may not seem too exciting at first glance, but it would be no exaggeration to say that the know-how of Ookuwagata rearing is actually concentrated there.
It is most exciting to breed large imagoes using various techniques.
Especially, rearing them in glass bottles allows you to observe their growth and metamorphoses and is therefore highly recommended.
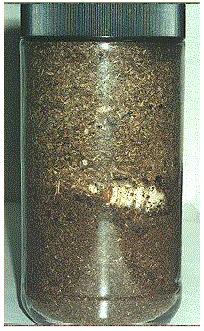
Rearing in glass bottles
Fill glass bottles with the mat to rear the larvae.
This is the most common way to rear them, as you can observe their growth from the egg to their final emergence. Also it tends to let the insect grow faster than in a natural environment. Some cases are reported in which the imago emerged in only 7 months of incubation.
The following method is easy and sure, and recommended for beginners.
(1) Preparations
Prepare the following materials.
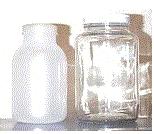
o Glass bottles
You had better choose glass bottles with wide openings so that you can easily exchange the mat. The bottle should be able to contain more than 1 liter, which would be a large honey bottle or an instant coffee bottle.
If you find someone picking up coffee bottles in a garbage collection area, he might be your friend. ;-p
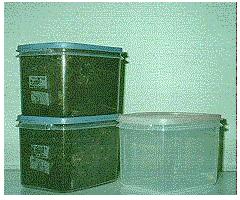
| Other than the bottles, miniplastic containers and Tupperware may be fine. A small plastic container may be about 125 yen and Tupperware 100 yen, which is quite economical. Tupperware is translucent and is not good for observation purpose and the larva might bore a hole through it. So a miniplastic container is recommended. But as the larvae scratch the container and make it translucent, it is impossible to see inside after using it over a couple of times. Maybe it is safe to consider them just as consumable supplies. |
o Mat (flakes)
Try first maybe only with the conventional flakes on the market.
It must contain only broad leaf tree flakes such as Kunugi, and the finer the better.
It should never contain needle leaf tree chips.
o Hammer or a grinding stick
Use it when preparing the bottle with flakes.
(2) Preparation of the mat
Heat treatment and moisture needed to avoid prevalence of ticks and drosophilae.
o Killing the insects by heating the mat
Apply some similar measures described earlier in this manual.
o Keeping the mat moisturized
Add adequate moisture to the mat, to the extent that the mat does not fall apart and yet no water oozes out when you grip it hard in your hand. Too much moisture should be absolutely avoided as it leads to lack of oxygen, unsuccessful ecdysis and decomposition of the mat that may kill larvae.
On the other hand, excessive dryness seldom leads to death of larvae. But the mat should be adequately moisturized for healthy growth of the larvae.
o Setting
It does take your time and effort, but once you are through with this work you don't have very much to do later. Be encouraged.
o Filling the bottle with mat
Use the grip of a hammer or a grinding stick to stuff the bottle with mat very hard. Make it really hard so the walls don't collapse when larvae bore holes there.
It would be easier to stuff it in a few separate portions rather than to do it all at once.
o Setting the larva
Make a small hollow in the middle of the mat and release the larva there. It will bore into the mat by itself.
o Preventing lack of oxygen
Drill a couple of small holes of about 2mm in diameter into to the lid of the bottle.
o Preventing ticks and drosophilae
Place a sheet of paper towel or the like between lid and bottle. Or you might as well wrap the entire lid with the paper towel and fasten it by a rubber band. Caution: If the paper towel collects water, it may seal up the bottle leading to lack of oxygen. If you don't mind very much about ticks and drosophilae, you might as well forget about this measure.
(3) Control
Once you set the larva, there is not much left to do farther on. Spend your time in observation.
o Where to keep
Select a relatively cool place inside a house without much fluctuation of temperature. Extreme warmth and fluctuation may lead to early accomplishment of the required accumulation of temperature which means an emergence of a small imago, or in the worst case, the death of the larva.
o Moisturization
Use a water sprayer when it seems too dry. Do it only to the extent that no dew emerges inside the larva's pit.
|
|
ü@
(4) Change the mat
The larva eats more and more as it grows. If there are only a few good parts left in the mat, it's about time to change the mat.
o When to change
When most parts of the mat inside the bottle turn into a different color and the larva starts moving around a lot, the bottle must be filled with the larva's excreta. Now it's about time to change the mat.
o How to change the mat
Take out carefully the old mat and the larva and fill the bottle with new mat. When you fill the bottle with new mat, make sure that the top quarter of the bottle is filled with the old mat.
| The larva first chews on the mat and mixes it with its excreta, and then lets it ferment (caused by the bacteria in the excreta). When the larva finally eats this mixture, it is easy to digest. |
ü@
|
|
ü@
(5) Prepupa and pupation
When the third stage larva gets really fat and somehow yellowish, it starts making a pupation chamber where it turns into a prepupa and then to a pupa.
|
|
ü@
Most of Ookuwagata's pupation chambers are created horizontally. That means, if your bottle is relatively small or the larva is very large, it may not be possible for the larva to create a large enough chamber if you keep the bottle in the upright position.
In order to avoid unsuccessful pupation and emergence, it would be a good idea to lay down the bottle before the larva starts creating the chamber. Or you might as well move it to a very large container long before.
In my case, I move it to a mini plastic container after rearing it for a while in a small glass bottle.
That would do for any large larva.
(6) Emergence
It takes another 3 to 4 weeks till it emerges.
The females and small individuals tend to emerge more quickly.ü@
o Emergence o
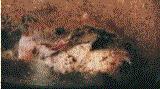
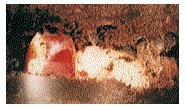
Courtesy of Mr. Machikane of Isezaki-cho, Gumma pref., we are able to present precious scenes of emergence here.
Refer to Mr. Machikane's webpage at http://www.kakaa.or.jp/~isobe/ookuwa/index.htm
(1) Just before emergence June 20. PM 5:06
 ü@
ü@
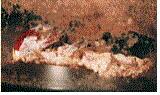
(2) June 20. PM 8:10
Emergence starts. The head appears.
It lies on its back first, as a female would do.
 ü@ ü@
ü@ ü@
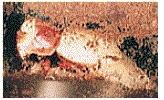
(3) June 20. PM 8:15
The eyes appear. The legs are moving and seem to be breaking the old skin.
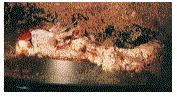
(4) June 20. PM 8:23
The entire mandibles appear. They look great.
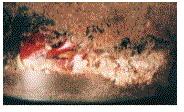
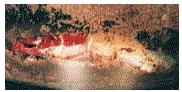
(5) June 20. PM 8:31
Almost all of the body appears except for its very end.
Meanwhile it flipped. Embarrassed ?
(6) June 20. PM 8:39
It emerges, standing on its legs. The rear wings are still wrinkled.
Its head is folded.

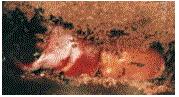
(7) June 20. PM 9:04
The rear wings are straight now. The head is still folded.
(8) June 21. AM 1:38
The head has straightened but the rear wings are still not folded.
Unlike a female, it became very large all of a sudden as it unfolded its head.
(9) June 21. AM 9:00
Finally it is a complete imago with its rear wings nicely folded.
(7) Taking out the imago
After a successful emergence and when its body gets hard enough, you may take it out of the bottle. Leave it there usually for about a month. Never try to take it out before it is ready.
Or you might as well just leave it there till it climbs out of the mat by itself. The timing depends on the season. If it emerges in the fall, it stays in the chamber for the following winter in a state of hibernation and starts activity in around May.ü@
|
|
(8) Food
A newly emerged imago takes some time till it starts eating, depending on the season. Be patient and observe it carefully till it is ready to eat something.
ü@
Rearing in wood blocks
In this method you rear the larva in a block of whitely decayed wood such as Kunugi and Konara (acorn trees). This method is closer to the natural environment and it is said to be easier to raise a large imago compared with rearing in the bottle. The bad points about this method are that it takes a little longer time and that you can't observe its growth at all so that it is hard to know when the imago is ready to be taken out.
ü@
(1) What to prepare
Prepare the items in the following list
o Woods for rearing
They can be the same ones as the bed woods. The fatter and larger the better.
o Rearing container
Anything large enough to contain the wood block is enough.
o Mat for burying the block
Compost (decayed broad leaves) may do. But as it might be contaminated by chemicals and insecticides, it is safer to use the dedicated insect mat. In this case, the mat doesn't have to be of fine grains.
(2) Preparation
Heat and moisten the block and the mat for an adequate environment. Take the same measures repeatedly explained in previous sections.
(3) Setting
Unlike that with bottles, this setting is very easy. Once you set the larva you are not going to see it again till it finally emerges out. Say farewell to the larva;-)
o Drill a pit in the block
Drill a pit large enough to house the larva.
o Setting the larva
Set the larva in the pit.
o Burying the block in the mat
Place the block in the container and bury it completely with the mat.
o Prevention of dryness and lack of oxygen
Drill a few holes of about 2mm in diameter in the lid of the container. If you use a plastic container, place a sheet of wrap with small holes between the lid and the container.
(4) Control
Very much the same as with bottle rearing. But as the entire mass is greater, it is easier to keep the necessary moisture. Though you may leave it alone for a long time, it may be a better idea to take a look at it every now and then.
(5) Change the block
It depends on the size of the wood block, but some larvae may eat up the block completely.
If the block looks completely eaten up and the larva still seems to be growing, you had better give it another block. Actually, as you can't see exactly what is going on inside, it is hard to judge. Use your extra senses.
(6) Taking it out
You make your guess as to when it emerges and take it out a little after its emergence by cracking the wood block. (The treatment after taking it out is the same as with rearing in bottles.) Or would you rather take your time and wait until it comes out by itself ?
4) Rearing of larvae for veterans
If you succeed in breeding some Ookuwagata, you might as well challenge yourself with some other methods whose interest lies mainly in making the larvae grow larger to get really large imagoes. However, keep in mind that these methods may cause a higher death rate in the larvae, so they are not recommended if you have only a few larvae.
(1) Fine grain mat rearing
Use a blender to mill the conventional mat into fine grains. As the mixer goes out of order once in a while when you use it for wood crumbs, you had better use a very cheap one (like 2,000 yen), considering it a consumable.
(2) Adding nutrition
Add some nutrients to the conventional mat or to the fine grain mat. This method is very popular and easy and is highly recommended for beginners.
The flour adding method 1 is quite safe and is recommended for beginners.
| The smaller amount of nutrients, the safer. But you must understand that the lower risk leads to a lesser effect as a matter of course. |
| Flour adding method 1
Mix 5 to 10 percent of flour to the entire mat. Stir it well and add a relatively large amount of water, and leave it in a large plastic clothes container or the like. Stir it well once in a while for ventilation. Be careful not to let the mat "rot". If it gets adequately fermented, its color turns dark brown and its smell turns into that of common soil. After complete fermentation let it dry a little bit before using it for larvae. Flour adding method 2 Mix flour the same as in method 1 except that you add only a little water to it and use it for larvae without preceding fermentation. The smaller amount of flour you add, the greater chance you have of preventing molds and unwanted decomposition. Flour and SG adding method Add 5 to 10 % of flour and 3 % of SG (Sodium Glutaminate) and let it ferment as in method 1. Other nutrients Some people try flour and sugar, or even royal jelly and chitin, chitosan and some powderized vitamin pills. Many vendors in Japan sell some dedicated nutrients to add and they have some reports of good results. |
ü@
(3) Kinshi (fungus) bottle rearing
A fungus bottle is filled with certain kinds of prevailing fungus, of certain kind such as Kawaratake (Coriolus versicolor) and Oohiratake(Pleurotus Abalonus). The bottle looks completely white with the fungus. As it is difficult for individuals to plant and grow such fungi without the adequate facilities, it would be better to buy those bottles from dedicated vendors. Although it is difficult to handle these bottles, it has been proven that extremely large imagoes can be reared with them and many people actually like to use them. It is said that imagoes over 80mm emerged out of such bottles.
(4) Kinsho (fungus body) rearing
Kinsho is the fungus body itself. In other words, the contents of fungus bottles in large blocks. You fill your bottles with this by yourself, but it is naturally more difficult than the preset Kinshi bottles.
| Some larvae don't grow very well in Kinsho or Kinshi bottles. It depends on whether the larva has the necessary bacteria to digest the fungus or not. If its mother has the bacteria, the larva seems to have it, too. And it does not seem to have anything to do with genetic inheritance. Generally, if you breed them over generations in the same fungus they seem to grow very well. |
ü@
|
|
ü@
(5) Rearing in a green house
If you buy a green house that would be used in gardening and rear Ookuwagata there, there would be no need for hibernation and you can breed and observe them throughout the year.
Especially when you rear some tropical insects, a green house is a must.ü@
(6) Other
The following is a quick list of general notes on rearing. ü@
o Emergence
If the temperature is low during the pupa stage, it takes longer till emergence and the imago size tends to shrink.
To prevent this, you had better keep the pupa in a relatively warm place as soon as it pupates to promote earliest possible emergence.
| If you keep them in a green house of 24 degrees C to 30 degrees C, Ookuwagata can emerge early, even in the middle of winter. |
o Change of food when rearing in bottles
If the larva doesn't like the food, it dies without eating anything. If you change the food and notice that the larva is not eating it at all, you had better change the food again. Do not forget to use a part of the old food that it was actually eating.
If you leave it for a while and suddenly notice that the rear end of the larva seems translucent, it is already in a dangerous state. You had better take necessary measures before it dies.
o Do not change the method of rearing
If you rear a larva by one method for a while, a complete change of method will usually cause the larva to shrink, thereby leading to a smaller imago.
o Birth control
If a female lays eggs early in the season or under green house conditions, it starts laying eggs again in the fall. But the eggs in fall are usually small and some of them don't hatch. As it would only shorten the life of the female, it may be better to take out the bed wood.
o Rearing of imagoes in a dark place
Imagoes are especially sensitive to light. If it is too bright some of them just don't appear at all. It is recommended to rear them in a relatively dark place.
Especially during pairing and egg laying periods, it seems to be better to cover the entire container with something to shut out the light.
o Setting of bed woods
If you don't need too many eggs, a couple of thin bed woods may do.
o Promotion of egg laying
Dissolve the excreta of larvae into water and spray it over the bed wood. The female does choose such wood to lay eggs.
o How to use chitin, chitosan and royal jelly
Powderize a chitin-chitosan pill and two royal jelly pills and mix them with a liter of insect mat to fill the rearing bottles and Tupperware.
Chitin-chitosan is a component included in the shells of crabs, shrimps and insects. The original form is chitin. Chitosan is a converted compound of chitin for better digestion. Chitin is not water-soluble while chitosan is. Therefore among nutritional supplements, those labelled chitosan only may be better nutrients to add.
Refer to Mr. Miki's webpage
http://www.justnet.or.jp/home/dtown.miki/dtc_4.html
o Pairing of new imagoes
While the male matures in about 2 months, the female needs about a half year to mature. Therefore, if you force them to mate, the female refuses and the male may get mad and may kill the female. You had better avoid pairing them in the year of emergence..
o Adding SG(Sodium Glutaminate)
If you saturate the bed wood with SG solution, the female lays many eggs in it.
o Setting the bed woods
If you peel off the bark, it seems easier for them to lay eggs and the eggs will be found everywhere. They will usually lay eggs in the cut end if the bark is left on.
If the eggs are laid in the cut end only, the larvae's paths will be vertical to the cut end surface and do not intersect with each other. This will make it easier to crack the bed wood to take the larvae out later.
3. Final words
Many thanks to the following people for kind instructions and useful materials.
Instructions
Mr. égéģéÆéÅ
e-mail : Hero@po.teleway.ne.jp
Materials
Mr. Miki
e-mail : dtown.miki@jsn.justnet.or.jp
HP URL: http://www2.justnet.ne.jp/~dtown.miki/
Mr. Machikane
e-mail : isobe@s1.kakaa.or.jp
HP URL : http://www.kakaa.or.jp/~isobe/index.htm